


How to Check Automatic Transmission Fluid
Notice: Too much or too little fluid can damage the transmission. Too much can mean that some of the fluid could come out and fall on hot engine parts or exhaust system parts, starting a fire. Too little fluid could cause the transmission to overheat. Be sure to get an accurate reading if checking the transmission fluid.
Before checking the fluid level, prepare the vehicle as follows:
1. Start the engine and park the vehicle on a level surface. Keep the engine running.
2. Apply the parking brake and place the shift lever in P (Park).
3. With your foot on the brake pedal, move the shift lever through each gear range, pausing for about three seconds in each range. Then, move the shift lever back to P (Park).
4. Allow the engine to idle (500 – 800 rpm) for at least one minute. Slowly release the brake pedal.
5. Keep the engine running and press the Trip/Fuel button or trip odometer reset stem until TRANS TEMP (Transmission Temperature) displays on the Driver Information Center (DIC).
6. Using the TRANS TEMP reading, determine and perform the appropriate check procedure. If the TRANS TEMP reading is not within the required temperature ranges, allow the vehicle to cool, or operate the vehicle until the appropriate transmission fluid temperature is reached.
Cold Check Procedure
Use this procedure only as a reference to determine if the transmission has enough fluid to be operated safely until a hot check procedure can be made. The hot check procedure is the most accurate method to check the fluid level. Perform the hot check procedure at the first opportunity. Use this cold check procedure to check fluid level when the transmission temperature is between 27°C and 32°C (80°F and 90°F).

1. Locate the transmission dipstick at the rear of the engine compartment, on the passenger side of the vehicle. See Engine Compartment Overview for more information.
2. Flip the handle up and then pull out the dipstick and wipe it with a clean rag or paper towel.
3. Install the dipstick by pushing it back in all the way, wait three seconds, and then pull it back out again.
4. Check both sides of the dipstick and read the lower level. Repeat the check procedure to verify the reading.
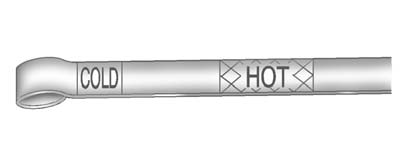
5. If the fluid level is below the COLD check band, add only enough fluid as necessary to bring the level into the COLD band. It does not take much fluid, generally less than 0.5 L (1 pint). Do not overfill.
6. Perform a hot check at the first opportunity after the transmission reaches a normal operating temperature between 71°C to 93°C (160°F to 200°F).
7. If the fluid level is in the acceptable range, push the dipstick back in all the way, then flip the handle down to lock the dipstick in place.
Hot Check Procedure
Use this procedure to check the transmission fluid level when the transmission fluid temperature is between 71°C and 93°C (160°F and 200°F).
The hot check is the most accurate method to check the fluid level. The hot check should be performed at the first opportunity in order to verify the cold check. The fluid level rises as fluid temperature increases, so it is important to ensure the transmission temperature is within range.

1. Locate the transmission dipstick at the rear of the engine compartment, on the passenger side of the vehicle.
See Engine Compartment Overview for more information.
2. Flip the handle up and then pull out the dipstick and wipe it with a clean rag or paper towel.
3. Install the dipstick by pushing it back in all the way, wait three seconds, and then pull it back out again.
4. Check both sides of the dipstick and read the lower level. Repeat the check procedure to verify the reading.

5. Safe operating level is within the HOT cross hatch band on the dipstick. If the fluid level is not within the HOT band, and the transmission temperature is between 71°C and 93°C (160°F and 200°F), add or drain fluid as necessary to bring the level into the HOT band. If the fluid level is low, add only enough fluid to bring the level into the HOT band. It does not take much fluid, generally less than 0.5 L (1 pint). Do not overfill.
6. If the fluid level is in the acceptable range, push the dipstick back in all the way, then flip the handle down to lock the dipstick in place.
See also:
MP3 Format
There are guidelines that must be met, when creating an MP3 disc. If the guidelines
are not met when recording a CD-R(W), the CD may not play. The guidelines are:
Sampling rate: 16 kHz, 22.05 kH ...
Remove the Cargo Cover
1. Remove the cover from the channels and carefully roll it back up.
2. Slide the button on the top to release the cartridge.
3. Pull up to remove the cartridge from the pins.
WARNING
An ...
Uniform Tire Quality Grading
Quality grades can be found where applicable on the tire sidewall between
tread shoulder and maximum section width.
For example:
Treadwear 200 Traction AA
Temperature A
The following info ...