


Securing a Child Restraint Designed for the LATCH System
WARNING!
If a LATCH-type child restraint is
not attached to anchors, the child
restraint will not be able to protect
the child correctly. In a crash, the
child could be seriously injured
or killed. Install a LATCH-type
child restraint properly using the
anchors, or use the vehicle safety
belts to secure the restraint,
following the instructions that
came with the child restraint and
the instructions in this manual.
WARNING!
Do not attach more than one child
restraint to a single anchor.
Attaching more than one child restraint to a single anchor could cause the anchor or attachment to come loose or even break during a crash. A child or others could be injured. To reduce the risk of serious or fatal injuries during a crash, attach only one child restraint per anchor.
WARNING!
Children can be seriously injured
or strangled if a shoulder belt is
wrapped around their neck and
the safety belt continues to
tighten. Buckle any unused safety
belts behind the child restraint
so children cannot reach them.
Pull the shoulder belt all the way
out of the retractor to set the lock,
if the vehicle has one, after the
child restraint has been installed.
Notice: Do not let the LATCH
attachments rub against the
vehicle’s safety belts. This may
damage these parts. If necessary,
move buckled safety belts to
avoid rubbing the LATCH
attachments.
Do not fold the empty rear seat
with a safety belt buckled.
This could damage the safety belt
or the seat. Unbuckle and return
the safety belt to its stowed
position, before folding the seat.
1. Attach and tighten the lower attachments to the lower anchors. If the child restraint does not have lower attachments or the desired seating position does not have lower anchors, secure the child restraint with the top tether and the safety belts.
Refer to your child restraint manufacturer instructions and the instructions in this manual.
1.1. Find the lower anchors for the desired seating position.
1.2. Put the child restraint on the seat.
1.3. Attach and tighten the lower attachments on the child restraint to the lower anchors.
2. If the child restraint manufacturer recommends that the top tether be attached, attach and tighten the top tether to the top tether anchor, if equipped. Refer to the child restraint instructions and the following steps:
2.1. Find the top tether anchor.
2.2. Press the ribbed area of the cover to open the cover and expose the anchor.
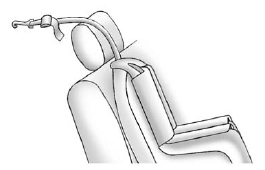
2.3. If you have an adjustable head restraint, raise the head restraint.
2.4. Route, attach, and tighten the top tether according to your child restraint instructions and the following instructions:
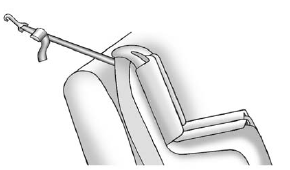
If the position you are using does not have a headrest or head restraint and you are using a single tether, route the tether over the seatback.
If the position you are using does not have a headrest or head restraint and you are using a dual tether, route the tether over the seatback.
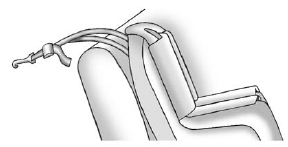
If the position you are using has a fixed headrest or head restraint and you are using a dual tether, route the tether around the headrest or head restraint.
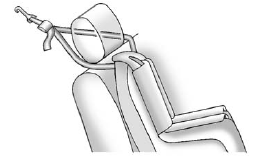
If the position you are using has a fixed headrest or head restraint and you are using a single tether, route the tether over the headrest or head restraint.
3. Before placing a child in the child restraint, make sure it is securely held in place. To check, grasp the child restraint at the LATCH path and attempt to move it side–to–side and back–and–forth. There should be no more than 2.5 cm (1 in) of movement for proper installation.
See also:
SBZA Error Messages
The following messages may appear in the DIC:
SIDE BLIND ZONE ALERT SYSTEM OFF: This message indicates that the driver has
turned the system off.
SIDE BLIND ZONE SYSTEM UNAVAILABLE: This message i ...
Recording from Audio Discs
REC (Record): Press to start
recording tracks from the disc while
it is playing. The radio has the
option to record the current track
playing or all tracks from the CD.
Press the softkey unde ...
Rocking Your Vehicle to Get It Out
Turn the steering wheel left and right to clear the area around the front wheels.
Turn off any traction or stability system. Shift back and forth between R (Reverse)
and a forward gear, spinning t ...