


Installing the Crossrails
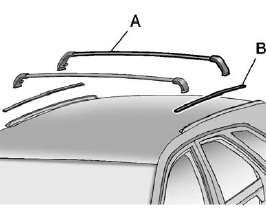
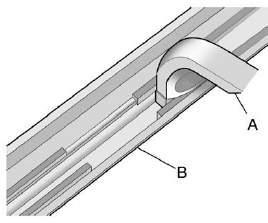
A. Crossrails
B. Siderail Cover
Before installing the crossrails (A), remove the siderail covers (B). Pull straight up on the rear of the siderail cover. Store covers flat, do not stack items on them.
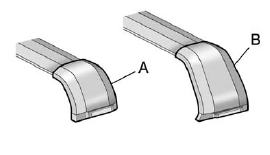
1. Identify the front and rear crossrail.
2. The front crossrail (A) is smaller than the rear crossrail (B).
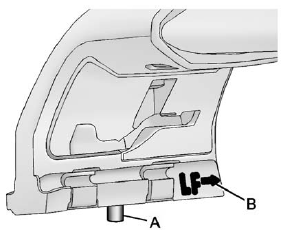
3. The crossrail supports are labeled with an arrow (B) that needs to point toward the front of the vehicle. A pin (A) will be visible on the bottom when the crossrail support lever is down.
To install the crossrail support, move the lever into the forward upper position; the pin (A) will not be visible.
4. Locate the forward or rearward cut-out in the siderail channel.
5. Insert both crossrail ends into the cut-outs, making sure the arrows are pointed toward the front of the vehicle.
6. Levers must still be in the forward up position. Move the front crossrail forward beyond the cut-out area (B). For the rear crossrail, slide the crossrail assembly (A) rearward until the entire crossrail support is in first position beyond the channel cut-out area (B).
7. Move the levers on both crossrails to the down position.
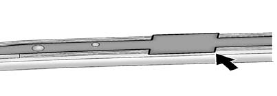
Slide the crossrail until the crossrail pin engages.
8. The crossrails should lock in the same hole position on each side.
See also:
Conference Calling
Conference calling and three—way calling must be supported on the Bluetooth
phone and enabled by the wireless service carrier to work.
To start a conference while in a current call:
1. Turn or ...
Tire Rotation and Required Services Every 12 000 km/ 7,500 mi
Rotate the tires, if recommended for the vehicle, and perform the following services.
See Tire Rotation .
Check engine oil level and oil life percentage. If needed, change engine
oil an ...
High-Beam On Light
The high–beam on light comes on
when the high-beam headlamps are
in use.
See Headlamp High/Low-Beam
Changer for more
information. ...