


Remote Control Buttons
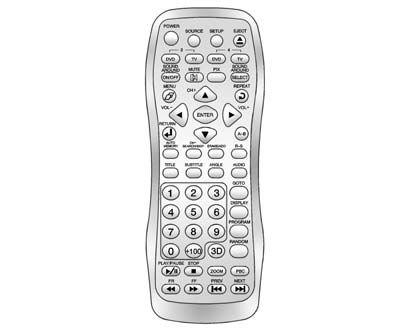
POWER: Press to turn the Headrest DVD RSE system on and off.
SOURCE: Press to select between Monitor 3, Monitor 4, or AV INPUT. Any video equipment connected to the AV inputs automatically overrides the source selection.
SETUP: Press to change the default settings, see “Using the RSE On-Screen Display (OSD) Menus” later in this manual. There are four main menu screens, each screen displays a menu to select different setting options. The screens are:
1. General Setup — adjusts screen settings.
2. Audio Setup — sets the language.
3. Preference Screen — sets the subtitles and parental controls.
4. Password Setup — allows a password to be set.
Press SETUP again to exit.
EJECT  : Press to eject or reload
a disc.
: Press to eject or reload
a disc.
DVD-Video Screen 3: Press the DVD button located under 3 to transmit IR codes for DVD mode on Video Screen 3.
TV-Video Screen 3: This button is not used with the system.
DVD-Video Screen 4: Press the DVD button located under 4 to transmit IR codes for DVD mode on Video Screen 4.
TV-Video Screen 4: This button is not used with the system.
SOUND AROUND ON/OFF: Press to turn the FM Transmitter power on or off.
MUTE  (For DVD Only): Press to turn
off the headphone sound. Press again to turn the sound on again.
(For DVD Only): Press to turn
off the headphone sound. Press again to turn the sound on again.
PIX (Picture Selection): Press to adjust the picture’s On Screen Display (OSD). Each time this button is pressed, the picture adjustment OSD, cycles through bars for BRIGHTNESS, CONTRAST, COLOR, and TINT. Use the right/left navigation arrows to adjust the setting. This feature automatically shuts off id another button is pressed or adjustments are not made within six seconds.
SOUND AROUND SELECT: Press to select an FM transmitter channel. The SOUND AROUND SELECT lets the DVD audio play over the vehicle’s sound system by tuning the radio to one of the six FM frequencies listed below.
- CH1 : 88.3MHz
- CH2 : 88.7MHz
- CH3 : 89.1MHz
- CH4 : 89.5MHz
- CH5 : 89.9MHz
- CH6 : 90.3MHz
MENU: Press to enter the DVD disc menu while the disc is playing.
 (Navigation Arrows): Press to navigate
through menus.
(Navigation Arrows): Press to navigate
through menus.
ENTER: Press to enter a selected function or to begin playback of the disc.
REPEAT  : Press to repeat part or
all of a chapter, title, track, or the entire disc after using the A-B button to
setup repeat preset sections.
: Press to repeat part or
all of a chapter, title, track, or the entire disc after using the A-B button to
setup repeat preset sections.
RETURN  : This button is not used
with the system.
: This button is not used
with the system.
A-B: This button is used to setup repeat preset sections. Press this button once
while the disc is playing to select the starting position. Press a second time to
select the end position. Press a third time to turn the function off. To view the
preset section, press .
AUTO MEMORY: This button is not used with the system.
SEARCH/SKIP: This button is not used with the system.
ERASE/ADD: This button is not used with the system.
R-S: This button is not used with the system.
TITLE: Press to enter the disc title mode. The title feature is disc-specific, and may not be available on all discs.
SUBTITLE: Press to change the subtitle language to another available language or to turn subtitles off.
ANGLE: Press to select a different viewing angle for discs that are recorded with different camera angles.
AUDIO: Press to select a different language for discs that are recorded with different languages.
0-9 (Numbers): The numbers located on the lower left side of the remote control can be used to enter numbered menu options, channels, or track numbers.
GOTO: Press to enter the GOTO menu to choose a desired title, chapter, track, or song inside the disc.
DISPLAY: Press to scroll through display information on the upper left corner of the screen, such as title, chapter/track, time elapsed, and time remaining, or to turn off the display
PROGRAM: Press to edit a playback program containing desired titles in the DVD or tracks in the CD-DA.
3D: Press to change between different 3D audio modes for DVD or CD.
The options for DVD are: Off, Rock, Pop, Live, Dance, Techno, Classic, and Soft.
The options for CD are: Off, Concert, Living room, Hall, Bathroom Cave, Arena, and Church. RANDOM: Press to play titles randomly.
PLAY/PAUSE  : Press to start playback
of the disc, or to pause playback.
: Press to start playback
of the disc, or to pause playback.
STOP c : Press to stop playback of a disc.
- To resume disc playback, press PLAY.
- To start playback from the beginning of the disc, press STOP, STOP, then PLAY .
ZOOM: Press to either enlarge the viewed image by 2X, 3X, and 4X, or reduce the image by 1/2X, 1/3X, and 1/4X.
PBC (Playback Control): Press to turn video CD playback control on or off.
FR  (Fast Reverse): Press to fast
reverse the disc. Press multiple times to choose between 2X, 4X, 8X, 16X, and 32X
speeds.
(Fast Reverse): Press to fast
reverse the disc. Press multiple times to choose between 2X, 4X, 8X, 16X, and 32X
speeds.
FF  (Fast Forward): Press to fast
forward the disc. Press multiple times to choose between 2X, 4X, 8X, 16X, and 32X
speeds.
(Fast Forward): Press to fast
forward the disc. Press multiple times to choose between 2X, 4X, 8X, 16X, and 32X
speeds.
PREV  (Previous): Press to play the
previous chapter or track. To return to previous chapters or tracks one at a time,
press and release multiple times until the desired chapter or track is reached.
(Previous): Press to play the
previous chapter or track. To return to previous chapters or tracks one at a time,
press and release multiple times until the desired chapter or track is reached.
NEXT  : Press to play the next chapter
or track. To go to the next chapter or track one at a time, press and release multiple
times until the desired chapter or track is reached.
: Press to play the next chapter
or track. To go to the next chapter or track one at a time, press and release multiple
times until the desired chapter or track is reached.
Battery Replacement
To change batteries in the remote control:
1. Turn the remote control face down.
2. Press down on the ridged area of the battery cover and slide it off.
3. Install two AAA batteries into the battery compartment.
4. Slide the cover back on until it clicks.
If the remote control is to be stored for a long period of time, remove the batteries and keep it in a cool, dry place.
See also:
Engine Power Messages
ENGINE POWER IS REDUCED
This message displays when the vehicle's engine power is reduced.
Reduced engine power can affect the vehicle's ability to accelerate.
If this message is on, but there ...
Drunk Driving
Death and injury associated with
drinking and driving is a global
tragedy.
WARNING!
Drinking and then driving is
very dangerous. Your reflexes,
perceptions, attentiveness, and
judgment can ...
SERVICE BATTERY CHARGING SYSTEM
This message displays when there
is a problem with the generator and
battery charging systems. Driving
with this problem could drain the
battery. Turn off all unnecessary
accessories. Stop a ...