


Address Entry
 Address Entry: Enter either a city
or street to use the address entry destination method.
Address Entry: Enter either a city
or street to use the address entry destination method.
To enter a destination by inputting the city name first:
1. Press DEST.
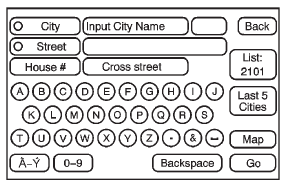
2. Select  (Address Entry).
3. Select the state/province screen button, if needed, to change the current state or province. A list of all of the available states and provinces appear. Select the state or province.
4. Once a state or province has been selected the City name category is automatically selected for entry.
Enter the City Name or press the Last 5 Cities screen button.
The Last 5 Cities screen displays a list of the last five city names that had been entered. Select a city from the list and it appears in the City name area.
If using the alpha keyboard, finish entering the city name. If five or fewer names are available, a list displays. If more than five are available, the List screen button displays a number. This number represents the number of available cities. Press this button to view the list and select a city.
5. Once a city has been selected the Street name category is automatically selected for entry. Start entering the street name. If five or fewer names are available, a list displays. If more than five are available, the List screen button displays a number. This number represents the number of available streets. Press this button to view the list.
6. Once a street has been selected, press House to enter the house number. The system displays the house number range that is available for the street.
7. Press GO. The map screen, with the destination marked displays.
8. Select the route preference for Fastest, Shortest, or Other. The system calculates and highlights the route.
9. Press Start Guidance. The route is now ready to be started. See “Getting Started on Your Route” in this section for more information.
To enter a destination by entering the street name first:
1. Press DEST.
2. Select  .
.
3. Select the state/province screen button, if needed, to change the current state or province. A list of all of the available states and provinces appear. Select the state or province.
4. Select Street and start entering the street name or press the Last 5 Streets screen button.
If the street name is common, the city might need to be entered first.
The Last 5 Streets screen displays a list of the last five street names that had been entered. Select a street from the list and it appears in the Street name area.
If using the alpha keyboard, finish entering the street name. If five or fewer names are available, a list displays. If more than five are available, the List screen button displays a number. This number represents the number of available streets. Press this button to view the list and select a street.
5. Once a street has been selected, select House to enter the house number. The system displays the house number range that is available for the street.
6. Once the house number is selected, the city name automatically populates. If there is more than one city available for selection, a list of cities display. Select the city.
7. Press GO. The map screen, with the destination marked displays. 8. Select the route preference for Fastest, Shortest, or Other. The system calculates and highlights the route.
9. Press Start Guidance. The route is now ready to be started. See “Getting Started on Your Route” in this section for more information.
To enter a destination by entering a cross street:
1. Press DEST.
2. Press  .
.
3. Select the state/province screen button, if needed, to change the current state or province. A list of all of the available states and provinces appear. Select the state or province.
4. Select Street and start entering the street name or press the Last 5 Streets screen button. If the street name is common, the city might need to be entered first.
The Last 5 Streets screen displays a list of the last five street names that had been entered. Select a street from the list and it appears in the Street name area.
If using the alpha keyboard, finish entering the street name. If five or fewer names are available, a list displays. If more than five are available, the List screen button displays a number. This number represents the number of available streets. Press this button to view the list and select a street.
5. Once a street has been selected, select Cross Street and start entering the cross street name. If five or fewer names are available, a list displays. If more than five are available, the List screen button displays a number. This number represents the number of available streets. Press this button to view the list and select a street.
6. Press GO. The map screen, with the destination marked displays.
7. Select the route preference for Fastest, Shortest, or Other. The system calculates and highlights the route.
8. Press Start Guidance. The route is now ready to be started.
See “Getting Started on Your Route” in this section for more information.
See also:
Cargo Tie-Downs
For vehicles equipped with cargo tie—downs, the four tie-downs are located
in the rear compartment of the vehicle. Use the tie-downs to secure small
loads. ...
Cleaning the Video Screens
The video display screens are made of a specially coated glass and can be scratched
or damaged by abrasive products, solvents, or ammonia-based window cleaners. Clean
with a soft, lint-free, cotto ...
California Fuel Requirements
If the vehicle is certified to meet California Emissions Standards, it is designed
to operate on fuels that meet California specifications. See the underhood emission
control label. If this fuel i ...